I don't try to hide my age (I'm 30...ask my son. He tells everyone). But this may be dating me a bit. Growing up, my mom had this awesome flannel board. She used it to put up little pictures that went along with stories she told us. I decided mini flannel boards for my kids are a must-have. I'm envisioning everything from build a jack-o-lantern kits to tic-tac-toe games. Come back tomorrow to see our first flannel board project.
This was really so easy I shouldn't even be writing a tutorial about it. It took me about 15 minutes and cost less than $2.50 each to make. I only had to buy the white boards...I had everything else on hand. Look around--you probably do, too.
Here's what you'll need:
White board: I used a cheapy from a discount store. Cheap is key here...you're looking for anything with a cardboard or pressboard backing. Something that will be easy to staple through. Really, anything lightweight with a frame and some type of non-glass center support will work. A picture frame, cork board, etc.
Fabric scraps: I used some white fleece, and some green flannel. The fleece is to build up the center of the board and make it flush with the frame. The flannel will wrap around the entire board. I had some left over from baby blankets...but I just realized I have so many little receiving blankets laying around. You could easily recycle one of those to cover a flannel board.
Hot glue gun, stapler (or staple gun), scissors, spray glue (optional).
Let's get started:
1. Cut a piece of fleece (or flannel, or felt) to fit inside the frame. Cut another larger one the exact size of the frame. Glue the pieces of fleece together, then hot glue them to the frame.
2. Cut a piece of flannel to go around the frame. Give yourself four inches of fabric on each side of the frame.
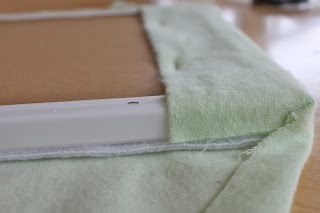
3. Fold one side up and over the frame. Hot glue it to the edges of the frame, and staple the edges of the fabric to the cardboard backing.
4. Trim the folded fabric so it hangs off about 1/2"...cut the extra fabric off the corner.
5. Glue the free hanging fabric down to the frame, fold and glue the corner of fabric so it fits flush with the frame. Repeat steps 3-5 with opposite side.
6. Do the same thing on the adjacent sides. Fold fabric, glue to frame, trim corners and staple.
7. Finish stapling edges of fabric to the back of the frame.
Ta-Da! You're all done. Now start dreaming up activities and projects you can do with your new flannel board.
***
UPDATE: These boards were jus sitting out during a play date we hosted. They were a hit. And Bonus! Charlotte loved playing the same game the "big kids" did. I loved that there were no choking hazards or game pieces she could destroy.


1 comment:
My boys would LOVE to each have their own flannel boards! This just made it's way onto my to do list.
Post a Comment